


 PDF SDK
 Other Tools
 Features
 Enterprise
 Partership
 Industries
 Hot Tips
 User Guide
 Company
Headers and footers in Excel worksheets serve as valuable tools for enhancing organization and clarity within your data. They allow you to include important information such as titles, page numbers, and timestamps, making your spreadsheet more professional and easier to navigate.


Key Uses and Applications
Navigational Aids
- Enhancing Readability: Headers serve as guides, making it easier for readers to navigate through complex data by displaying titles, chapter names, or sections.
- Facilitating Document Tracking: Footers are invaluable for adding page numbers, file names, or dates, aiding in document version tracking and simplification of large dataset referencing.
Branding and Consistency
- Professional Presentation: Customizing headers and footers with company logos or specific formatting styles ensures a consistent and professional appearance across reports and documents.
- Cohesive Document Appearance: Maintaining uniform headers and footers across multiple pages enhances the overall look and feel of the document, promoting brand identity and reader engagement.
Efficiency in Data Management
- Quick Information Access: Inserting relevant document information or data categorization tags in headers and footers allows for quick identification and access to specific sections of a spreadsheet.
- Improved Document Organization: Utilizing headers and footers for organizing documents facilitates better management of financial reports, academic research, project timelines, and more, making critical information readily available.
You can also read about converting Excel to PDF.
Inserting a Header in Excel
Step 1: Open the "Insert" tab at the top of Excel.
Step 2: Click on the "Text" group within the tab, then select the "Header & Footer" option. This action will show the header section on your current worksheet.

Step 3: Add your desired header elements in the displayed header section. You have three sections (left, center, right) to input your text or other elements.
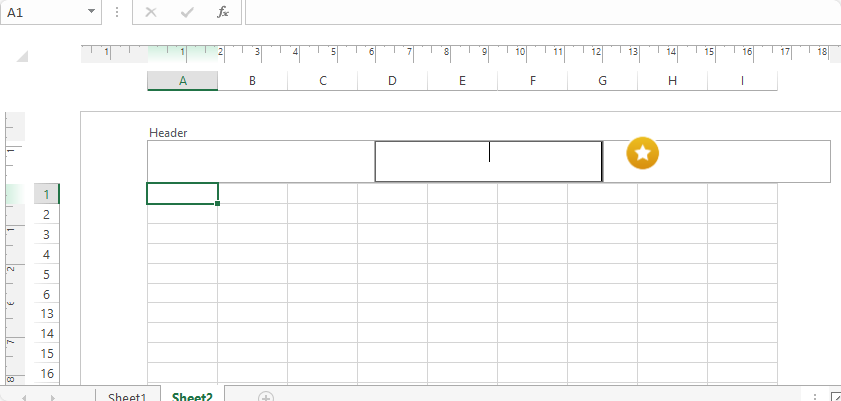
Step 4: Click anywhere outside the header area on the worksheet to finish. Your header is now set.
Inserting a Footer in Excel
Step 1: Repeat the first step for inserting a header: Go to the "Insert" tab.
Step 2: Click on the "Text" group and then choose the "Header & Footer" option, just like you did for the header.

Step 3: Look for the "Go to Footer" icon in the navigation group on the ribbon and click on it. This will switch the display to the footer section of your worksheet.

Step 4: Enter the footer elements you wish to add in the footer section. Like the header, you have three sections (left, center, right) to use.
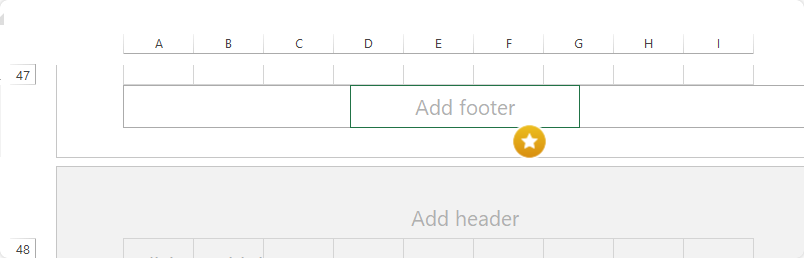
Step 5: To complete the process, click anywhere outside the footer area on your worksheet. Your footer is now active.
Editing or Formatting the Header and Footer in Excel
Step 1: Navigate to the "Page Layout" tab located at the top of Excel.

Step 2: Click on the page setup dialog box icon found at the bottom-right corner of the "Page Setup" group.
Step 3: Select the "Header/Footer" tab in the dialog box that appears. This will present you with options for "Custom Header" and "Custom Footer."
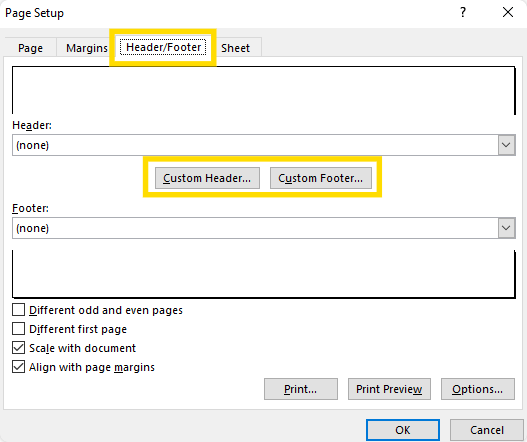
Step 4: Choose either "Custom Header" or "Custom Footer," depending on which one you wish to edit or format.
Step 5: In the custom header or footer dialog, click on the font icon. A pop-up menu will appear, allowing you to select or change the font size, color, style, and effects for your header or footer.

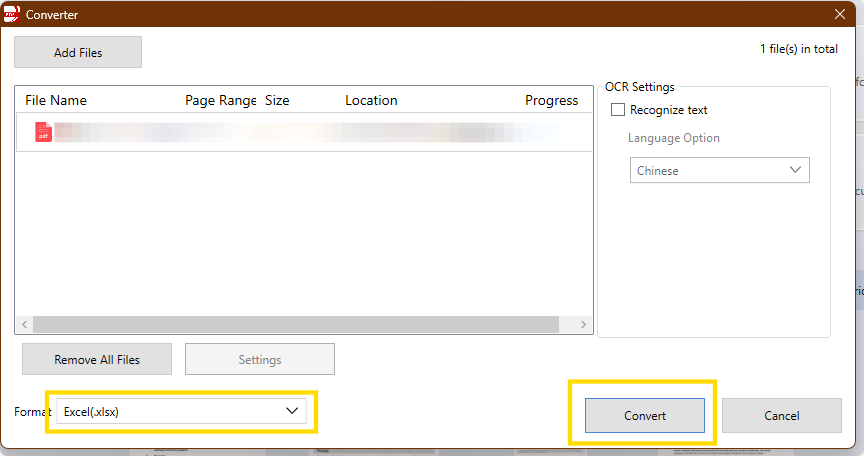
How to convert a PDF File to Excel on Windows
Step 1: Opening PDF Reader Pro
Launch PDF Reader Pro by clicking on its icon on your desktop or from the start menu.
 Free Download
  Free Download
Step 2: Click on the 'PDF To Excel' icon
Within PDF Reader Pro, find and click the 'PDF to Excel' icon, usually located in the toolbar.
Step 3: Click the Convert Button
After selecting your PDF file, press the 'Convert' button to begin the transformation process. The software will now work to accurately transfer your data from PDF to an Excel spreadsheet.
Step 4: Review your Excel file
Open and scroll through your newly converted Excel file to ensure all information has been transferred correctly and meets your expectations. This final step is crucial for verifying the accuracy and completeness of the conversion.

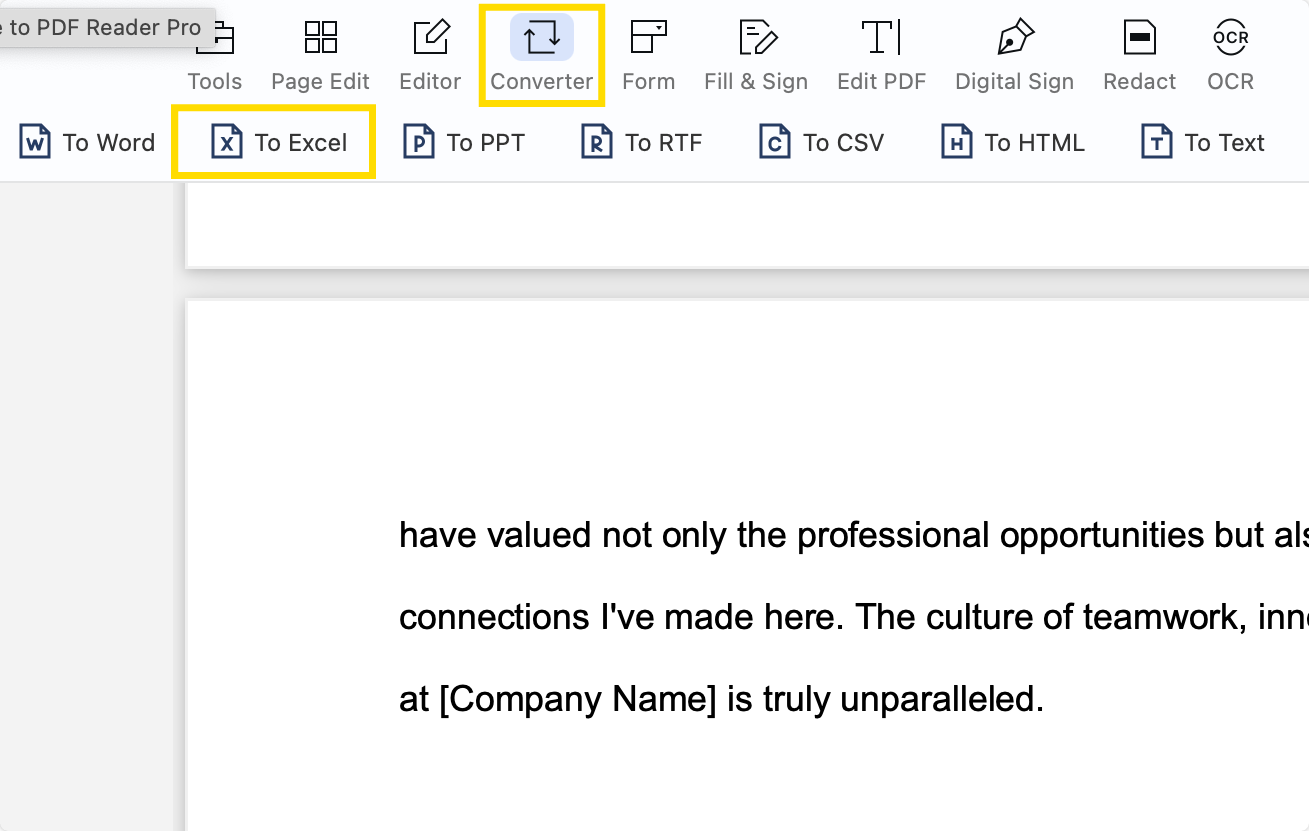
How to Convert a PDF into Excel on Mac?
Step 1: Launch PDF Reader Pro
Start by opening PDF Reader Pro on your Mac. Ensure you're in the main interface where you can access your PDF files.
Step 2: Select the 'PDF to Excel' Feature
Look for the 'PDF to Excel' icon in the toolbar or menu. This option is specifically designed for converting PDF documents into Excel format.
Step 3: Initiate the Conversion Process
With your PDF document opened in PDF Reader Pro, click the 'Convert' button. This action will start the process of converting your PDF into an Excel spreadsheet.
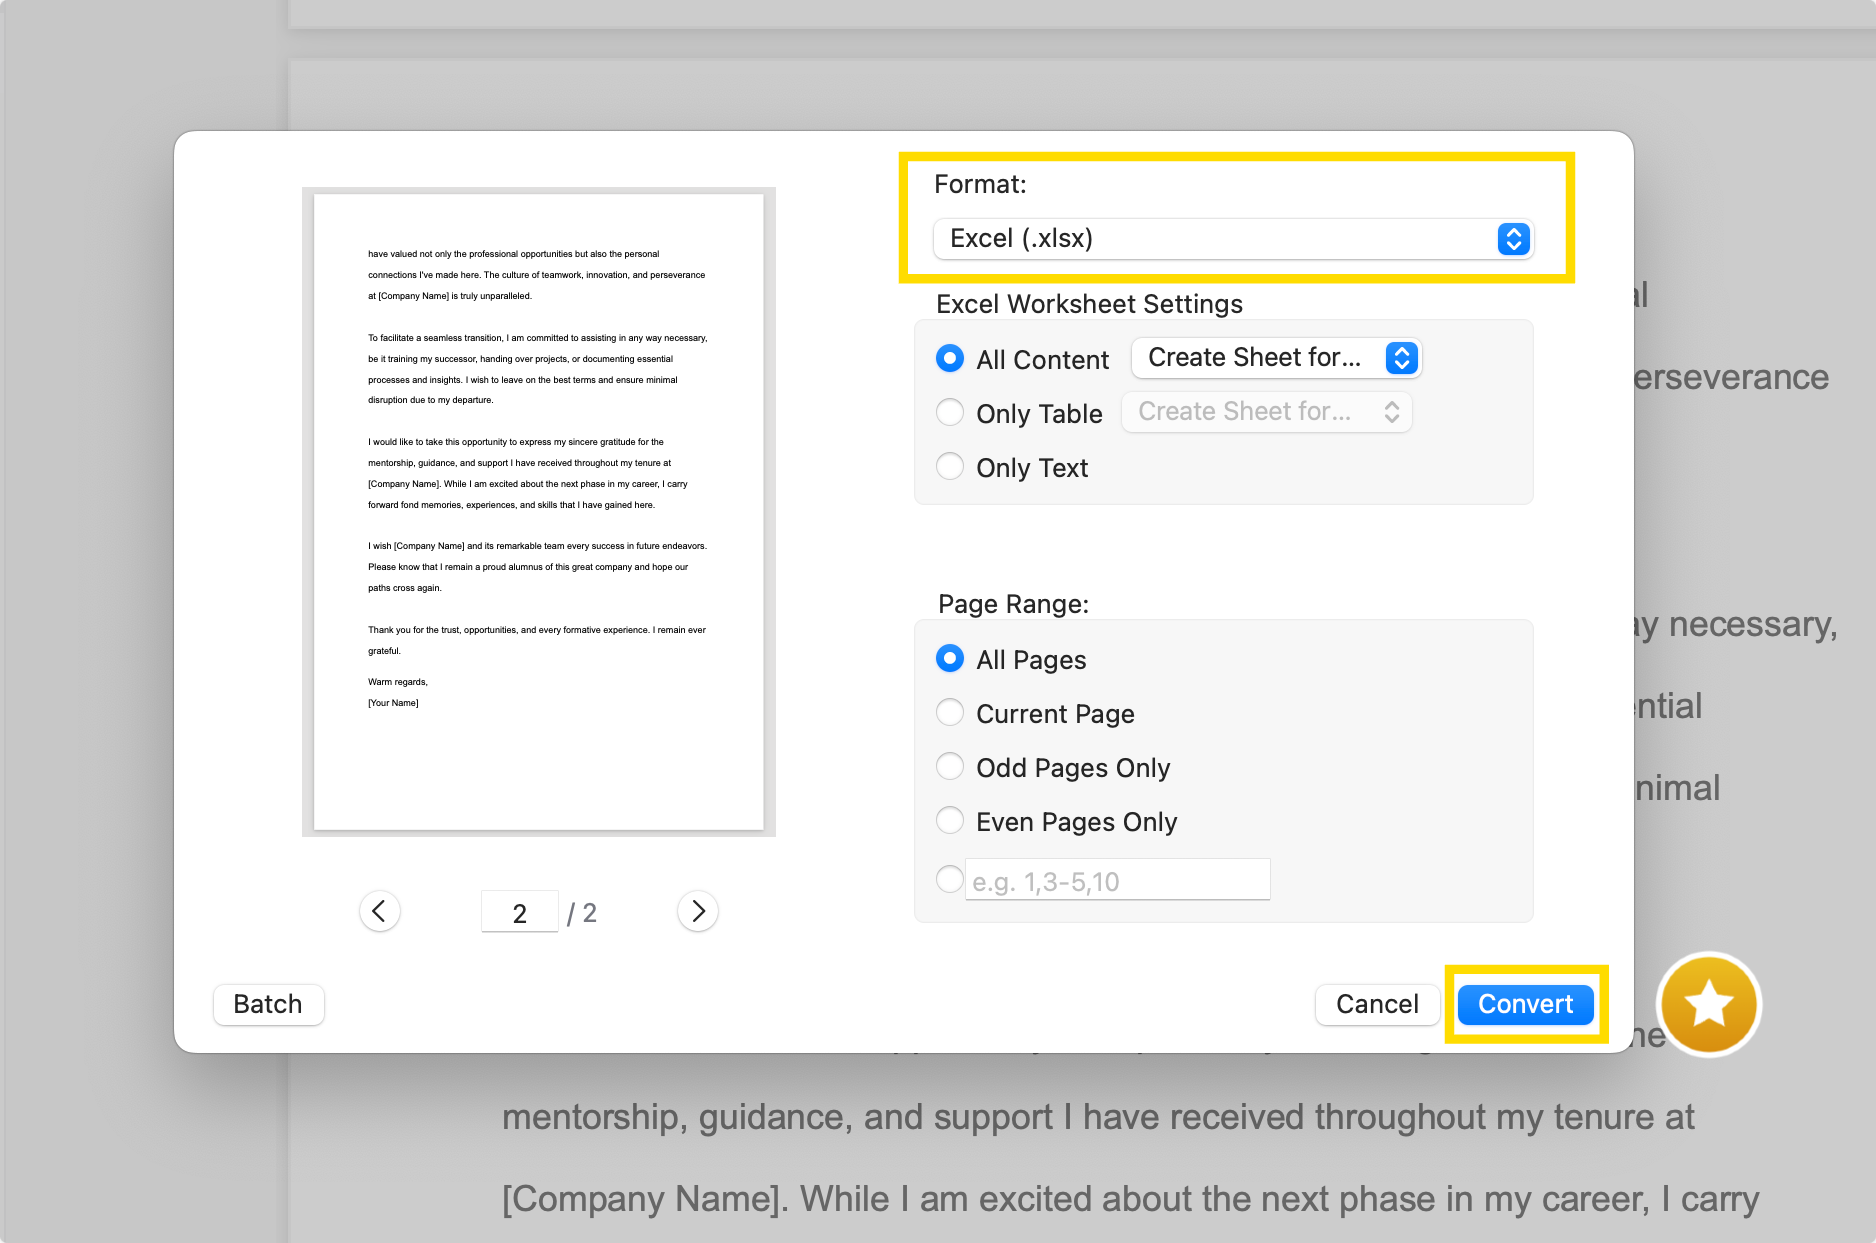
Step 4: Inspect the Converted Excel File
Once the conversion is complete, navigate through your newly converted Excel file. Review all the content to ensure everything has been converted accurately and is positioned as you need.
You can also check our recommendations on removing header and footer in Word.
Excel Header and Footer: Best Practices
1. Utilize Formatting Options Wisely
Excel offers a variety of formatting options for headers and footers, allowing you to tailor their appearance to suit your needs. Access these options through the "Insert Tab" where the "Header & Footer" button resides. From there, you can explore different font styles, sizes, and colors to make your header and footer stand out or blend seamlessly with your document.
2. Incorporate Preset and Predefined Headers for Efficiency
Excel provides preset and predefined headers within the "Header & Footer" tools, which you can access from the "Insert Tab". These presets, including the current date, file path, and page numbers, are designed to save you time. You can easily add dynamic elements like the "Current Time" by selecting them from the drop-down menu available in the header or footer text box.
3. Navigate Through the "Footer Tab" for Footer Customization
For those specifically looking to enhance their footers, the "Footer Tab" within the "Header & Footer" tools offers direct access to footer customization options. Here, the "Footer Button" reveals a range of footer presets and options for headers, allowing for quick insertion of standard information or more customized footer text.
4. Keep Your Spreadsheet in a "Normal Worksheet" View for Easier Editing
While customizing your header and footer, it's best to switch back to the "Normal Worksheet" view to see how your document will look in its most used state. This can be done easily by clicking the "Normal Button" on the "Status Bar", ensuring that your edits are as effective in practice as they are in theory.
5. Use the Footer Tools for Advanced Customization
The footer tools provide advanced options for those looking to add a bit more flair or specific information to their footers. From here, you can insert custom elements, such as images for headers or graphics, to headers making your document visually appealing and informative.
6. Regularly Update Your Header and Footer
To keep your document up to date, especially for files that are frequently revised, use dynamic headers and footers such as the "Current Time" or "File Path". This ensures that every printout or digital view of your document reflects the most current version.
7. Experiment With Preset Elements for Quick Edits
For users who need to make quick updates or are looking for inspiration, exploring the "Preset Elements" in the header and footer drop-down menu can provide quick fixes and ideas. These elements are designed to meet the common needs of Excel users, offering a blend of functionality and design.
8. Remember the Art of Header and Footer Insertion
Creating effective headers and footers is as much about the content as it is about the presentation. Ensure that your headers and footers do not clutter your document but rather enhance its readability and utility. Use the options in the header and footer tools judiciously to maintain a balance between aesthetics and information.

Excel Header and Footer: FAQ
What is a Preset Header in Excel?
A Preset Header refers to the built-in headers provided by Excel, designed to simplify the process of adding standardized information to your spreadsheet. These can include the document title, page numbers, or the current date.
How do I access Built-In Headers?
Built-in headers can be accessed through the "Header & Footer" button located on the "Insert" tab. Once clicked, Excel will display a variety of preset options for headers in a drop-down menu, making it easy to select and insert the one that fits your needs.
What is the Header Box in Excel?
The Header Box is a section within the Excel worksheet where you can type or insert predefined text, images, or dynamic content like page numbers. It's part of the header & footer editing mode and can be found in the central, left, or right sections of the page layout.
Can I customize Headers with Preset Options?
Yes, Excel allows you to customize headers using preset options available in the header drop-down menu. These options provide a straightforward way to add common header elements without manually typing them each time.
Where is the Header & Footer button in Excel?
The Header & Footer button is located under the "Insert" tab in Excel's ribbon. This button gives you quick access to entering the header and footer editing mode, where you can select from preset headers or create your own custom designs.
How can I add an Image to My Header?
To add an image to your header, enter the header editing mode, then choose "Picture" from the header drop-down menu or the "Header & Footer Elements" section. You can then select an image file from your computer to insert into the header.
What are the Options in the Header?
Options in the header include text formatting, inserting page numbers, current date, file path, and custom elements. You can access these options by clicking on the header area to bring up the "Header & Footer Tools" on the ribbon.
What is the Art of Header Insertion?
The art of header insertion involves creatively using text, images, and dynamic fields to make headers informative and visually appealing. This can mean balancing the amount of information, using graphics wisely, and choosing fonts that enhance readability.
What does the Central Header Box allow?
The Central Header Box allows you to place content in the middle section of your header. This is ideal for document titles or main subject headings, providing a focal point at the top of each page.
How can I create a Complex Header?
Creating a complex header involves using custom header elements, such as combining text with images or adding multiple dynamic fields like page numbers and the current date. This requires exploring the "Header & Footer Elements" for advanced customization.
Can I add Graphics to Headers?
Yes, graphics can be added to headers to enhance the visual appeal of your document. This can be done through the "Picture" option in the header editing mode, allowing you to insert company logos or other relevant images.
Is there a concise guide to adding text to Headers?
For a concise guide to adding text to headers, simply access the header editing mode by clicking the "Header & Footer" option under the "Insert" tab. Then, select the area in the header where you want to add text and type directly into the box.


