How To Turn Screenshot To PDF

Thu. 16 Feb. 20237463 Mins

In today's digital age, the internet is a treasure trove of information. Whether you're searching for academic sources, compiling data for work, or sharing compelling content with friends and colleagues, screenshots offer an uncomplicated way to capture and disseminate information.

On Windows and Mac operating systems, you have a variety of options for taking screenshots, ranging from simple keyboard shortcuts to specialized third-party "Screenshot on PC" tools equipped with advanced features like scrolling screenshots.

Notably, PDF Reader Pro further enriches your screenshot experience by providing an integrated tool specifically designed to capture key content in PDF files and documents.

How to Take PDF Screenshots on Windows with Keyboard Shortcuts

This article aims to guide you through multiple methods for taking screenshots on Windows, focusing on transforming screenshots into PDF formats, saving them in different image formats, and even integrating them seamlessly with services like Google Drive.

Method 1: PrtScr

This key has been around for quite some time. Just press the PrtScr button on your keyboard, and the entire screen will be captured, and the screenshot will be copied to your clipboard. Then, you can paste the screenshot to your preferred image editing app. 


Method 2: Windows Key-   + PrtScr

To save a screenshot, you should press the Windows Key (  ) and the PrtScr button at the same time. The entire screenshot will be saved in your screenshot folder and clipboard.


Method 3: Alt + PrtScr

To only snapshot the active window you're working in, hold the Alt and PrtScr buttons, and then the screenshot of the active window will be copied to your clipboard.


Method 4: Customize Screenshot Region

If you want to capture your screen at any other size, you can press Shift + Home Key + S, then a mini toolbar will appear at the top of your screen, allowing you to choose from take a rectangular, free-form, window, or full-screen capture.

How to Take PDF Screenshots on Mac with Keyboard Shortcuts

Step 1: Open the PDF file

Open the PDF you want to capture in Preview or any other PDF viewer you prefer.

Step 2: Navigate to the page

Scroll to the page you want to take a screenshot of.


Step 3: Choose a Keyboard Shortcut

You have three main options here:

  • Entire Screen: Press Command (⌘) + Shift + 3 to capture the entire screen.
  • Selected Portion: Press Command (⌘) + Shift + 4, then drag to select the area you want to capture.
  • Specific Window: Press Command (⌘) + Shift + 4 followed by the Spacebar. An icon will appear that you can click to capture just the PDF viewer window.


Step 4: Save the screenshot

By default, the screenshot will be saved to your desktop.


In addition to standard keyboard shortcuts, certain business applications come with built-in screenshot utilities that can be particularly useful. For instance, when you encounter valuable content in a PDF document, the integrated screenshot feature of the PDF viewer can be incredibly handy.

PDF Reader Pro is one such software that offers an in-built screenshot tool. With just a single mouse click, you can swiftly capture a screenshot of a PDF. Interested in learning how to use PDF Reader Pro's screenshot function? Here are two detailed guides for you for both Windows and Mac.

How to Screenshot a PDF for Windows Using PDF Reader Pro

Looking to screenshot a valuable section of a PDF? If you're in a rush and don't need a high-quality JPG image, a quick screenshot can do the trick using PDF Reader Pro.

pdfimage

Navigate, edit, and
convert PDFs like a Pro
with PDF Reader Pro

check

Easily customize PDFs: Edit text, images,
pages, and annotations with ease.

check

Advanced PDF conversion: Supports
multi-format document processing with OCR.

check

Seamless workflow on Mac,
Windows, iOS, and Android.

Don’t let PDFs slow your efficiency DOWNLOAD NOW


Step 1: Click on the 
Content Selection Tool from the toolbar.


Step 2: Select the area you wish to turn into an image

Click and drag a box around the content and click "Copy"


Step 3: Confirm your selection

Paste your selection using (Ctrl+V) into your preferred image editor or tool.


How to Convert Screenshot to PDF for Windows

Once you have your screenshot, you might want to turn it into an individual PDF file. Here is how to do it for Windows.

Step 1: Select Image to PDF from the Home menu

Select the screenshot you wish to convert to a PDF.


Step 2: Set your Abstract settings

Set your "File Information" and "The Permission" settings. 


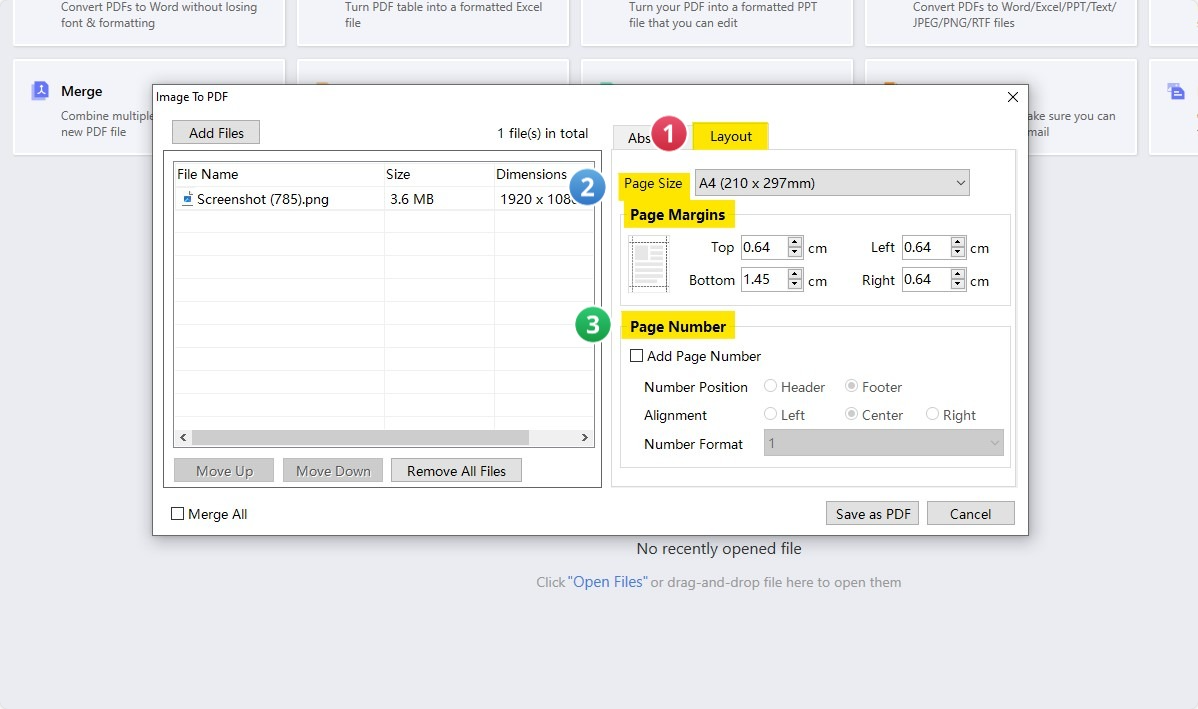
Step 3: Set your Layout settings

Select your "Page Size" (for example, A4), "Page Margins", and "Page Number" settings.


Step 4: Select Save as PDF

How to Screenshot a PDF for Mac Using PDF Reader Pro

Hello, Mac users! Capturing screenshots from PDFs is a breeze with PDF Reader Pro. This robust and multifaceted PDF reader and editor has got you covered for all your screenshot needs. Like its Windows counterpart, you can quickly grab a screenshot of any PDF content using PDF Reader Pro.

pdfimage

Navigate, edit, and
convert PDFs like a Pro
with PDF Reader Pro

check

Easily customize PDFs: Edit text, images,
pages, and annotations with ease.

check

Advanced PDF conversion: Supports
multi-format document processing with OCR.

check

Seamless workflow on Mac,
Windows, iOS, and Android.

Don’t let PDFs slow your efficiency DOWNLOAD NOW


Step 1: Click on Tools

Select the Content Selection Tool from the toolbar.


Step 2: Select the zone you wish to take a screenshot of 

Click and drag a box around the area you wish to turn into an image and click "Copy"


Step 3: Confirm your selection

Paste your selection using (Command-V) into your preferred image editor or tool.


How to Convert Screenshot to PDF for Mac

Step 1: Select Image to PDF from the Home screen

Choose the image you would like to turn into a PDF.


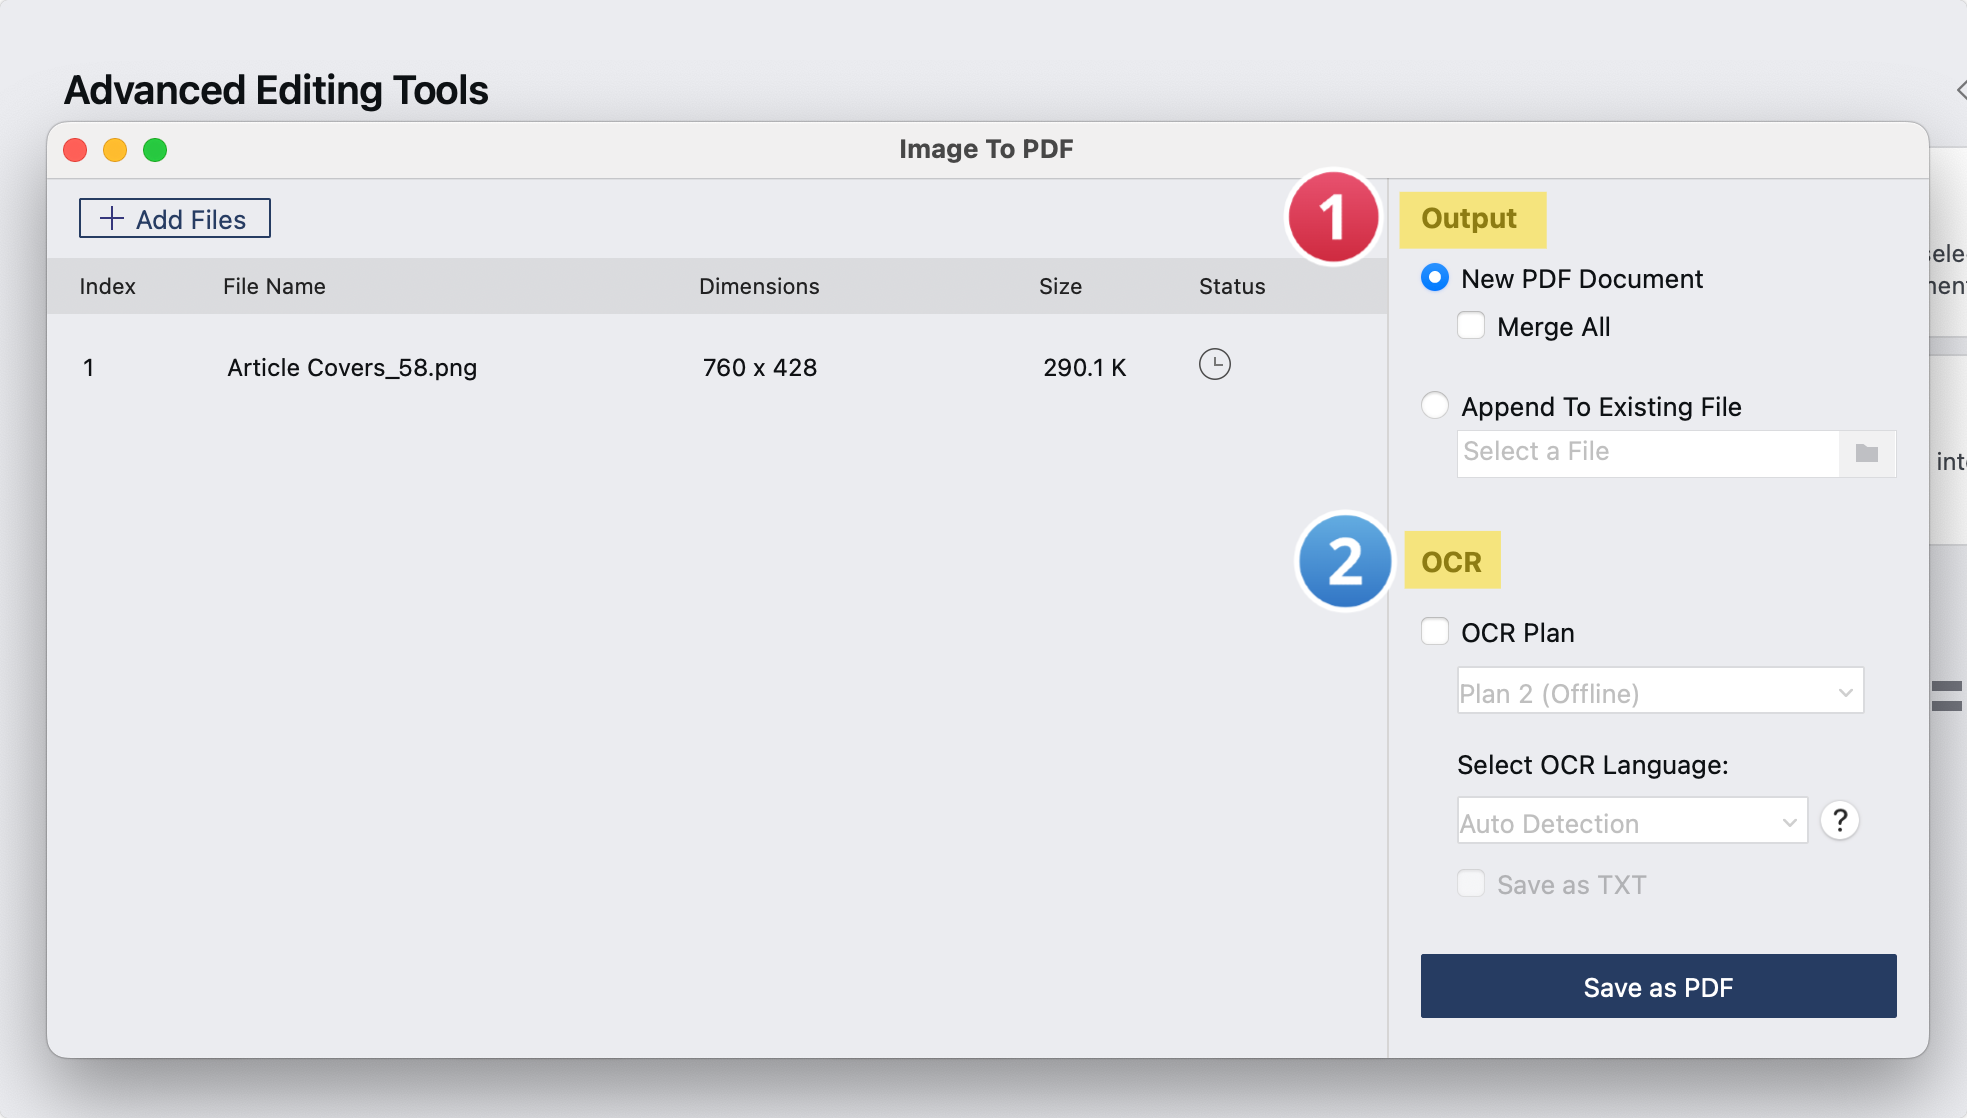
Step 2: Choose your settings in the Advanced Editing Tools

Select your "Output" and "OCR" settings. 


Step 3: Select Save as PDF


How to Convert Screenshots to PDF: Best Practices

Converting screenshots to PDF files is a seamless process, especially when you need a single PDF file for editing or document processes. If you're new to the world of efficient document management, here are some best practices to follow:

  1. Use High-Quality Screenshots: Make sure to use a screenshot tool that captures images in high resolution. This ensures the image quality remains intact when converted to PDF format.

  2. File Type Matters: Before converting, ensure your screenshots are in a compatible image file format like PNG files. PNG is generally a safe choice as it maintains image quality.

  3. Adobe Acrobat: For a more versatile tool with advanced features, consider using Adobe Acrobat. It offers powerful PDF tools that not only convert images to PDF but also offer an editing mode.

  4. Batch Conversion: If you have multiple screenshots, convert them into a single PDF document. This not only saves storage space but also makes it easier to access documents.

  5. Use the Print Option: Often, the print option in the Photos App provides an easy way to convert screenshots to PDF files. Choose 'Save as PDF' from the drop-down menu usually found at the bottom left corner.

  6. File Menu Choices: When using a PDF viewer like PDF Reader Pro, go to the file menu, usually located in the top-right corner. Choose the 'Convert to PDF' or a similar option to transform your image to PDF.

  7. Cloud Storage: If you’re using Google Workspace, utilize cloud storage for secure document sharing. After conversion, you can easily export documents to your Google Drive from the share icon.

How to Convert Screenshots to PDF: FAQ

Can I convert screenshots to PDFs without additional software?
Yes, many operating systems offer built-in image converting options like the Print Option, where you can save your screenshot as a PDF from a drop-down menu.

Is image quality lost when converting screenshots to PDF format?
If you use a high-quality source file and a reliable PDF converter, the loss in image quality is usually minimal.

Can I edit my PDF screenshots after conversion?
Yes, with powerful features in software like Adobe Acrobat or PDF Reader Pro, you can enter editing mode and make changes to your PDF screenshots.

What's the advantage of converting screenshots to a single PDF file?
Converting multiple screenshots into a single PDF document facilitates more streamlined and efficient document management. It also saves storage space.

How do I share my PDF files once they are converted?
Cloud storage options, particularly in Google Workspace, make sharing easy. Just click the share icon, which usually looks like an arrow icon, and choose where you’d like to send or save your file, including Google Drive.

Can I convert screenshots from my mobile device into PDF?
Yes, most modern mobile devices have apps that offer this functionality. Some even allow you to convert images directly from your Google Address Book or Google Workspace access.

By following these best practices and FAQs, you can convert your screenshots into the perfect document in minutes. Whether you need to fax documents, secure them for sharing, or create printable documents, converting screenshots to PDF files will simplify these tasks immensely. 

Get Started with PDF Reader Pro Today!