
Whether you’re a student, a professional, or anyone who relies on Word documents for their daily tasks, this post is your lifesaver in the digital sea of document creation. We will explore how to utilize search functions in various environments, including within Office 365 and other common document handling platforms.
You'll learn how to navigate through a list of documents, utilize default location settings to streamline your search, and understand the importance of the Documents List in keeping your files organized.
Additionally, we'll delve into the benefits of the 'Save AutoRecover' feature, a lifesaver in situations where documents are closed unexpectedly or changes are not manually saved.
Let's explore the reliable methods to bring your unsaved Word documents back from the digital abyss.


Looking for AutoRecover Files
If you're subscribed to Microsoft 365, you can look for backup files in these locations on your computer:
- C:\Users[YourUserName]\AppData\Roaming\Microsoft\Word
- C:\Users[YourUserName]\AppData\Local\Microsoft\Office\UnsavedFiles
Remember to replace "[YourUserName]" with your actual username.
If you can't find your file there, try this in Word:
Step 1: Open Word
Step 2: Click on 'File', then 'Info'

Step 3: Choose 'Manage Document'
Step 4: Click on 'Recover Unsaved Documents'
A screenshot will show you how to select 'Recover Unsaved Documents' under 'Manage Document'.
If you still haven't found your file, you can search manually for AutoRecover files:
Step 1: Click on the Start menu.

Step 2: Type ".asd" in the search box and press Enter.
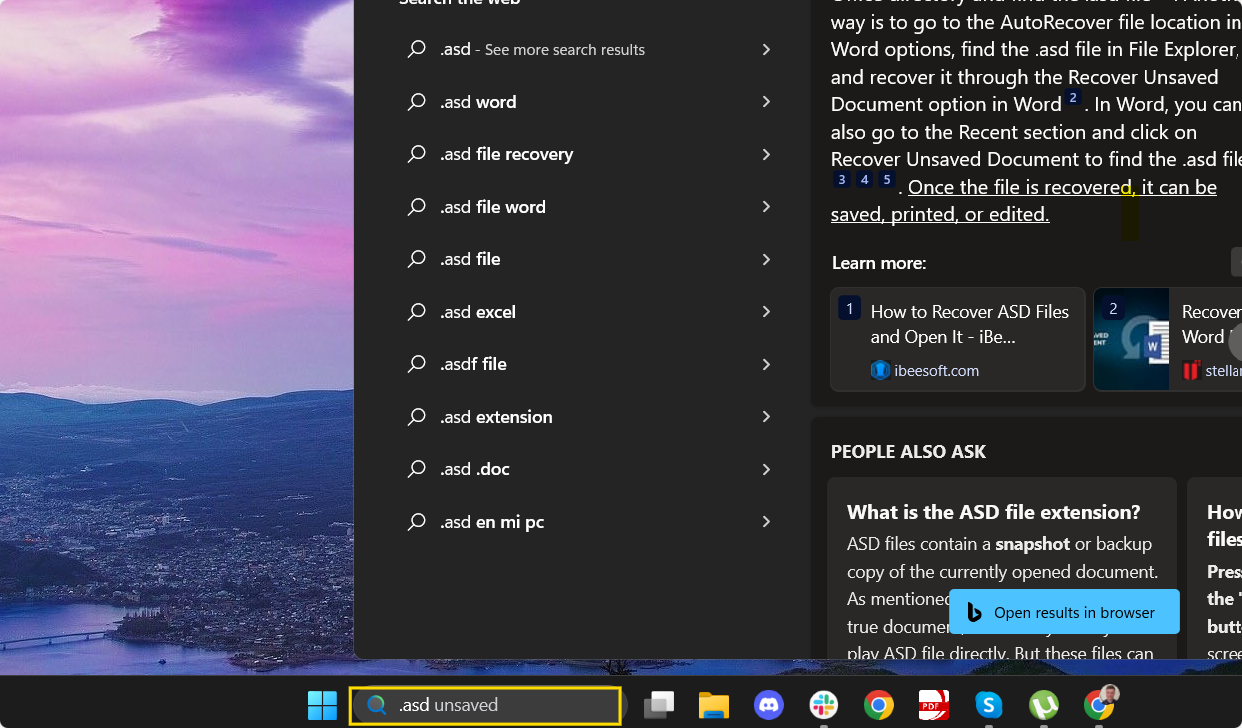
If you find any files with a .asd extension, here's what to do next:
Step 1: Open Word
Step 2: Go to 'File', then 'Open', and then 'Browse'

Step 3: In the file type list, next to 'File name', select 'All Files'

Step 4: Find the backup file, right-click on it, and choose 'Open'
If you don't find any .asd files, you'll need to try a different method.

Using Search to Find Documents
In today's fast-paced digital environment, efficiently locating your documents is crucial.
Whether you're a student, a professional, or just someone with a lot of digital paperwork, knowing how to effectively search for your documents can save you both time and stress.
The "Using Search to Find Documents" section is designed to guide you through the nuances of finding your documents quickly and efficiently.
Step 1: Select Start and type the document name
Step 2: If the Documents list displays the document, double-click it to open in Word
Step 3: If the search results do not include the file, proceed to the following method
Checking the Recycle Bin
Step 1: Double-click the Recycle Bin icon on the Desktop
Step 2: Browse through the list to find the deleted Word document
If you're not sure of the file name, look for file types such as .doc, .docx, and .dot
Step 3: If you find the Word document, right-click on the file name, and then select 'Restore' to recover the file
Step 4: If the document is not in the Recycle Bin, proceed to the next method
Using the Windows File Recovery Tool
Step 1: Ensure you are using Windows 10, version 2004, or later
Step 2: Download and install the Windows File Recovery tool from the Microsoft Store

Image source: Microsoft Store
Step 3: Use the tool to recover files that have been permanently deleted
Finding Missing Content or a Newer Version in Word
Step 1: If Word opens a document from SharePoint or OneDrive, ensure AutoSave is turned on.
This saves changes to the cloud document automatically.

Step 2: Ensure Word opens a document from your local disk or network shared folder
Check that AutoRecover is enabled and set the AutoRecover save interval to five minutes or less.
Explore our resource on How to Recover Different PDF Versions, designed to help you restore your documents effectively.
Restarting Word to Open AutoRecover Files
Step 1: Restart Word
Close and reopen Word to activate the AutoRecover file search.
Step 2: Check the Document Recovery Pane
If Word discovers any automatically recovered files, they'll appear in the Document Recovery task pane, labeled as "document name [Original]" or "document name [Recovered]."
Step 3: Open the Recovered File
Double-click the file in the Document Recovery pane.
Step 4: Save the Document
In Word, go to File > Save As and save the document as a .docx file.
Step 5: Rename File if Necessary
If needed, right-click the file and select Rename to change the extension to .docx.
Step 6: Note for Microsoft 365 Users
For Microsoft 365 users, Word automatically opens any recovered files in a Message Bar. Click Save to store the file as a .docx. If there are multiple recovered files, Word opens the last-changed files and places the rest in the Document Recovery task pane.
Searching for Temporary Files
Step 1: Search for ".tmp" Files
Select Start, type ".tmp", and press Enter. Then, choose the Documents tab.

Step 2: Review the File List
Look for file names that correspond with the last dates and times you edited the document.
Step 3: Repeat with Tilde Character
If the file isn't found, repeat the search using the tilde character (~) instead of .tmp.
Step 4: Open Folder in Word
In Word, navigate to File > Open, select the Folders tab, and search for the folder where the .tmp file was located.

Step 5: View Folder Contents
Select the folder name to display its contents.
Step 6: Open Folder in File Explorer
Click on the folder name at the top of the pane to open it in File Explorer.
Step 7: Adjust File Explorer Settings
In File Explorer, change the file type to All Files, located near the file name field at the bottom.
Step 8: Open the .tmp File
Finally, open the .tmp file that you have identified.

Explore our tips on how to recover an unsaved Word document, ensuring you never lose important work again.
How to Convert Word to PDF on Windows
Use the conversion tools built into PDF Reader Pro to easily produce a PDF file format from your Word document using your Windows operating system.
 Free Download
  Free Download
Step 1: Click the File Button on the Main Menu
Click "New" and select "From File".
Image Source: PDF Reader Pro
Step 2: Find Your File Location
Select a Microsoft Word file for PDF conversion from the different file types in your library.
Image Source: PDF Reader Pro
Step 3: Save Your PDF File
The file conversion from Word to PDF is now complete. 
Image Source: PDF Reader Pro
How to Convert Word to PDF on Mac
Use the advanced features offered by PDF Reader Pro to convert Microsoft Word documents to PDF files with ease on your Mac operating system.
Step 1: Click the File Button
Select "New" and "From File" from the drop-down options to use our PDF tools. 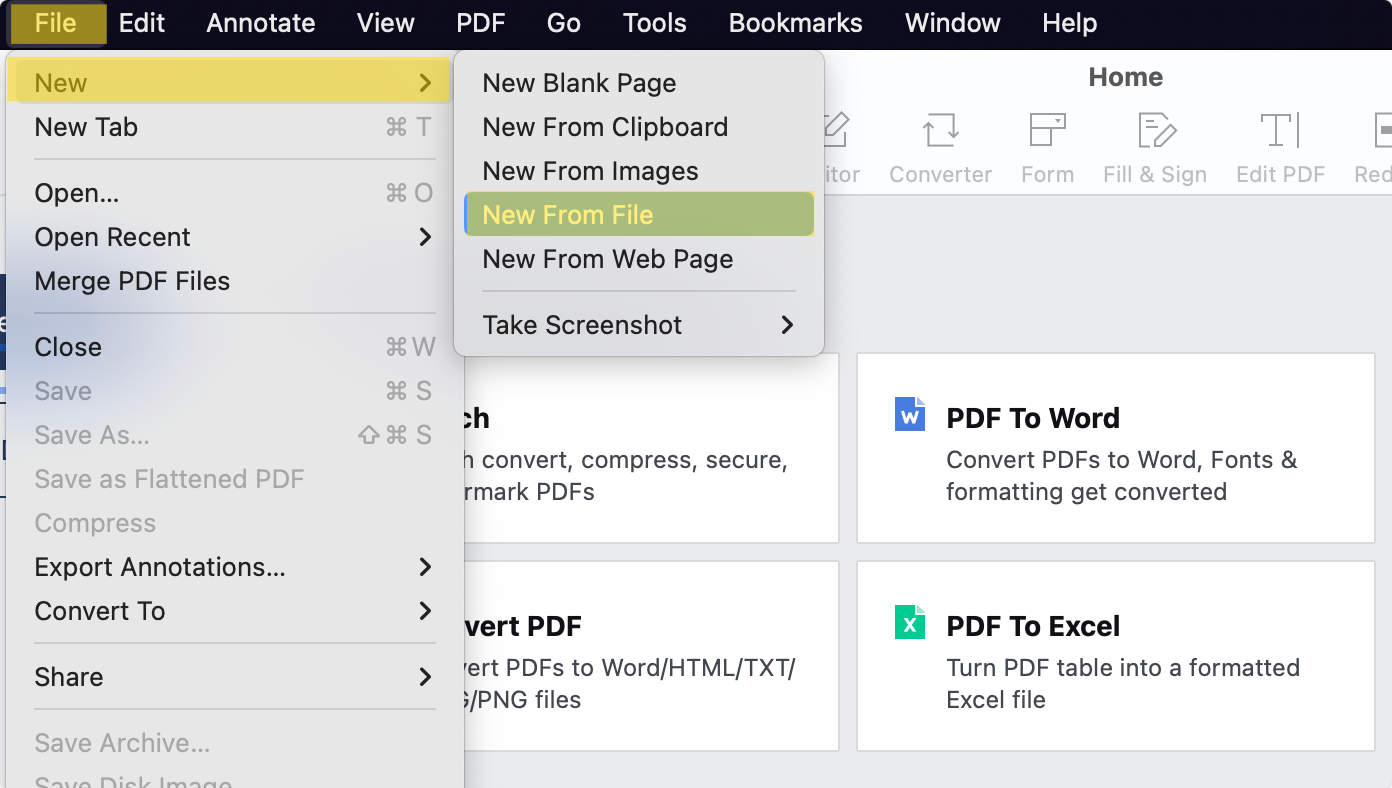
Image Source: PDF Reader Pro
Step 2: Go to Your Microsoft Word File Location
Find the Word document file format you want to convert and proceed to secure file uploading into PDF Reader Pro. 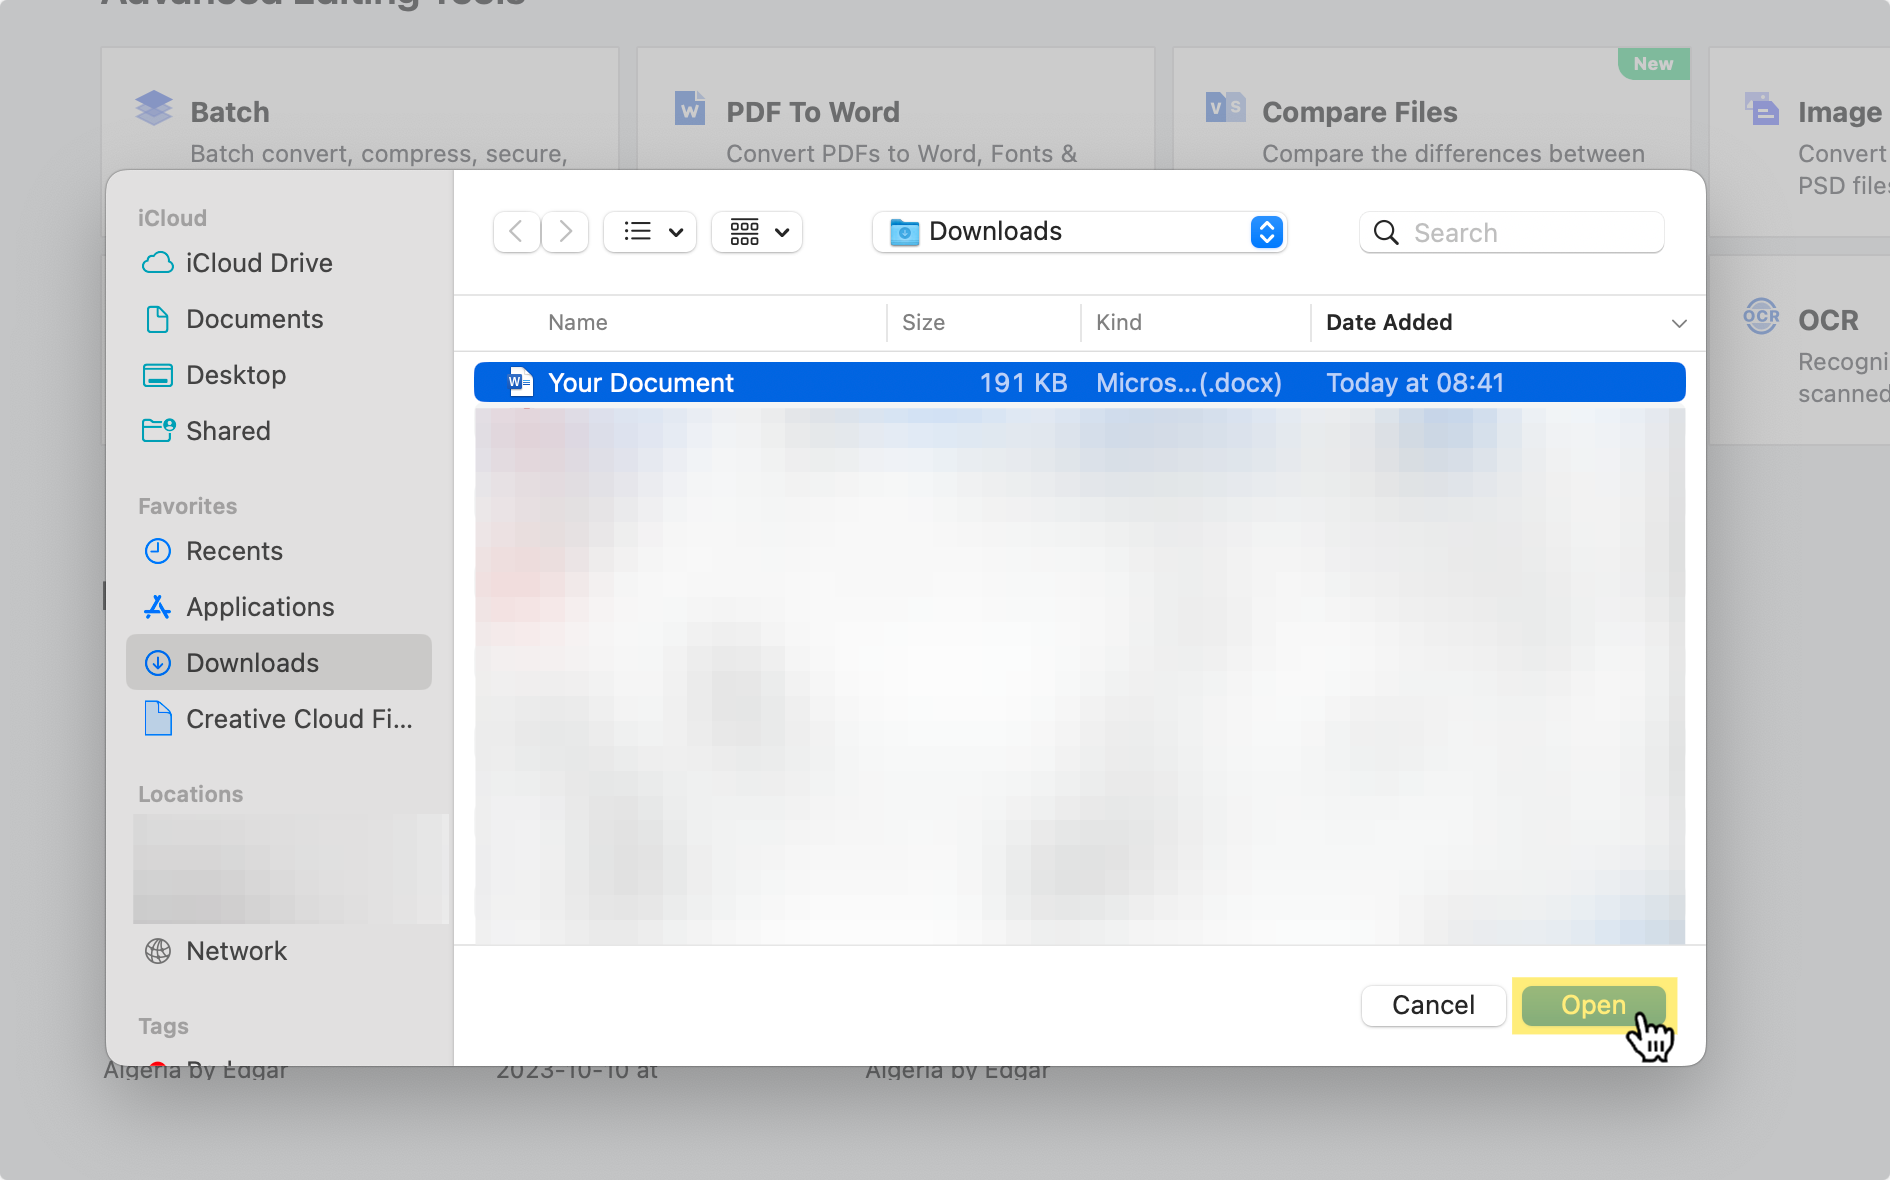
Image Source: PDF Reader Pro
Step 3: Save Your New PDF Document
Save your new file, as our PDF conversion tool has already turned your Microsoft Word document into a PDF with ease. Alternatively, use our share feature to send it as an email message or attachment.
Image Source: PDF Reader Pro
How to Find Unsaved Word Documents: Best Practices
Losing an unsaved Word document can be frustrating, but fortunately, there are several methods to retrieve them.
These best practices involve navigating through various options in Microsoft Word and your operating system to recover your work.
1. Using the File Tab and File Menu
- File Tab: Open Microsoft Word and click on the 'File' tab in the upper left corner. This gives you access to several recovery options.
- File Menu: Within the File Tab, explore the File Menu to find options like 'Info' or 'Recent', which may list unsaved documents.
2. Utilizing Search Functions
- Search Bar: If you remember any part of the document's name or content, use the search bar in File Explorer (Windows) or Spotlight (macOS) to locate it.
- Search Box: In Word's opening task pane or File Explorer, use the search box to filter through your files.
3. Recovering through Unsaved Files and Previous Versions
- Unsaved Files: Word often saves a temporary version of unsaved documents. Look for them under 'Recover Unsaved Documents' in the 'Info' section of the File Tab.
- Previous Versions: In File Explorer, right-click on the original location of the document and select 'Restore previous versions' to recover older copies.
4. Exploring File Explorer and Task Pane
- File Explorer: Navigate to the original file location or check temporary folders where Word might save backup copies.
- Task Pane: The task pane in Word can sometimes list recent documents, including unsaved ones.
5. Other Useful Tools
- Drop-Down List/Menu: Some recovery options are found in drop-down lists or menus within the File Tab or Documents Tab.
- Dialog Box: Pay attention to dialog boxes that pop up when you open Word after an unexpected crash, as they often offer recovery options.
- Documents Tab: Similar to the File Tab, the Documents Tab may have a list of recent or unsaved documents.
- Spotlight Icon: On macOS, use the Spotlight icon to search for file names or content across your computer.
6. Tips for File Types and Secure Locations
- File Type: Be aware of the file type (like .docx) while searching, as it helps narrow down the search.
- Secure Location: Regularly save documents in a secure location and consider automatic backup options to avoid losing work.
By incorporating these best practices into your routine, you can minimize the risk of losing unsaved Word documents and recover them more effectively when needed.

How to Find Unsaved Word Documents: FAQ
How Can I Recover an Original Document That Was Not Saved?
To recover the original document, first check the 'Document Recovery' tool that appears after Word reopens following a crash. If this doesn't work, look in the 'Recover Unsaved Documents' option in the 'File' tab.
Where Should I Regularly Save My Documents for Secure Backup?
Regularly save your documents in a secure location like an external hard drive, cloud storage, or a dedicated backup folder on your computer. This ensures that you have backup copies in case of unexpected losses.
What is the Role of the Documents Tab in Recovering Unsaved Files?
The 'Documents' tab in Word provides quick access to recent documents, including those not saved. It's found in the left navigation pane and can be a useful starting point for recovery.
How Do I Locate Backup Copies of My Word Documents?
Backup copies are usually saved in the same file location as the original document or in temporary folders. Check these locations and search for backup file names or earlier versions.
Can I Find Unsaved Word Documents by Searching for Specific File Names?
Yes, you can search for specific file names or file extensions using the search box in File Explorer or Finder. Remember to include common Word extensions like .docx or .doc.
How Do I Use the File Path to Find Unsaved Documents?
Navigate to the original file location using the file path. This could be in Office files' default save locations or where you last saved the document.
Is There a Way to Access Version History for Unsaved Word Documents?
Version history is typically available for documents saved on cloud services like OneDrive. You can access it by right-clicking the file and selecting 'Version history'.
What Are Some Effective Recovery Methods for Unsaved Word Documents?
Effective recovery methods include checking temporary folders, using the 'Recover Unsaved Documents' feature, and exploring the Autosave feature's settings to find the last saved state of the document.
Can Unsaved Word Documents Be Recovered on Mobile Devices?
Recovery options on mobile devices might be limited, but you can check the app's document recovery feature or look into the app's dedicated folder in the device's storage.
What Should I Do If the Application Crashes Before Saving My Document?
After an application crash, reopen Word and look for the 'Document Recovery' pane. It usually appears in a separate window and lists unsaved documents that Word attempts to recover.
Losing a Word document, whether due to application crashes, a faulty partition, or simply closing a document by accident, can be a distressing experience. However, the variety of recovery methods outlined in this guide offers a substantial success rate in retrieving your valuable work. From exploring the drop-down menu in Word for unsaved documents to delving into temporary folders for backup copies, each step guides you through the recovery process.
Remember, the key is to act quickly. As soon as you realize a document file is missing, use the file location filepath or the document recovery tool to start your search. Check the destination folder, navigate through the folder locations from the left panel of File Explorer, or use the context menu in the application. If a dialog window or a separate window pops up post-crash, pay close attention to the files list it presents.
For future safety, regularly use the backup copy option and adjust the save interval in your Word settings to minimize data loss. While the era of floppy disks is long gone, modern storage solutions offer more reliable and secure ways to safeguard your documents.
Finally, take a deep breath and approach the situation methodically. By following these recovery steps, you can increase your chances of rescuing your unsaved or lost documents, turning a potentially stressful situation into a manageable one.


 Support Chat